Monday, 25 September 2006

Creating Comics - Easy as!

Yesterday I downloaded an amazing mac only programme that helps you to create neat comics easily...

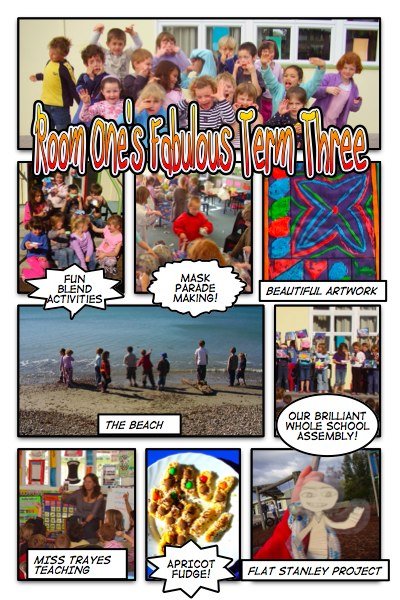
Comic Life is absolutely amazing, very user friendly and it allows you to quickly create a comic page using your digital photographs. It linked automatically to my iphoto and displayed all the pictures from my iphoto library. I simply chose a template for my comic and then dragged the pictures into the spots.

Check out this example that I made...


It's a shareware programme so you can use it for 30 days before registering it. After that you can still use it but apparently it will display a watermark on your work. However if you really like the programme registration costs just over $40NZ for a single non-commercial user.

Try it for yourself and download it from here!

Saturday, 23 September 2006

A CLOCK for your blog!

Today I put a clock showing the current New Zealand time on our class blog. This should be really useful due to the high amount of visitors we are getting from overseas.

I believe the clock will allow the visitors to "connect" with us on a more personal level as they'll be able to know what time of the day it is in New Zealand. I chose an analogue robot clock (same as the one I've put in the menu bar of this blog - or see below) which although doesn't show am/pm certainly is cool :)


There are so many other free clocks to use on your blog. You just select the one you want and copy and paste the html code into your blog. In Blogger go to Template>Page Elements>Add Page Element (on the sidebar)>HTML/Javascript. Then paste the code in and save.

Check all the clocks out here at Clocklink.

Friday, 22 September 2006

Webnotes for Children!

A week ago I created a Webnote area to be used by my students. It is basically digital sticky post-it notes. I plan to put a link to the webnotes on the blog during the school holidays. I hope the students will leave little notes detailing what they have been up to in the school holidays.

Here is a link to my class Webnote page.

Very easy to set up and could be quite a powerful tool if used by students, they can change the colour of the sticky notes and move them around on the screen. Looks like FUN!

Tuesday, 19 September 2006

Recording voice to share on your blog

In the weekend I set up a podcast for my class on the Podomatic website.
I planned to use it next term when I start investigating podcasting with my class.

However..... today proved much too much of a tempting opportunity...... a child approached me and said he had a whole bunch of his own jokes that he wanted me to write up for him on the blog..... what better an opportunity than to get the child to record themselves saying their own jokes!

Tait found it very easy to record his voice, sitting in front of the laptop is fine as the ibook G4's have built in microphones. I showed him what to press when he was finished and left him to it! When I came back he'd done a fine job but there was a lot of background noise. We sent some children outside to play (this occured before school) and he recorded again. It worked perfectly.

Broadband is obviously advisable for listening to podcasts, I found it quite difficult at home to listen back to what I had recorded through dial up internet.

Should be lots of fun next term!

********************

We are using Garageband to record, edit, mix and put together our podcasts. Podomatic is ideal for hosting your podcast so you can share it with others.

Sunday, 17 September 2006

Add cute captions to your photos - for FREE!

Very exciting!!!

Today I found a whole bunch of exciting photo enhancing tools that are SO COOL!

On this site you can add cool captions like speech and thought bubbles to your photos.
Check this one out from my personal photos, this is my gorgeous friend Diana who has just become an Aunty..


It is very easy to use, you upload your photo from your computer and type in what you'd like in the speech/thought bubble. Then it will upload the photo, you drag on the bubble and then it will process the photo so it can be saved with the caption in it. I just dragged the finished product onto my desktop!
They save as a jpeg so are easy-peasy to email or upload to your blog!


Exciting aspects for the classroom I think... turn boring photos into more entertaining ones!

Saturday, 16 September 2006

WOW! 500 hits on the class blog!

Today the Room One blog hit 500 visitors!

This is a FANTASTIC achievement since we have only been blogging since the end of June this year!

I have been getting a lot of traffic through the ULearn blog where we are listed and also through our IT Cluster blog.

If you're a bit of a nosey parker like me and like to see where you're getting your visitors from I suggest a Bravenet counter like I have on all my blogs. It is free and has a great statistics area where you can view number of visitors and even see how they got to your blog (eg. directly through typing address in, or reffered through another website)

I also like Bravenet counters because you can choose existing cute themes like my teacher/blackboard themed counter (I'm a sucker for gimicky cute stuff!)

Get your own Bravenet Counter here!

Tuesday, 12 September 2006

Put a video on your blog - You Tube

Today we made a video in class to show our parents how we skip count in 2's to solve multiplication problems. Then I edited the movie in imovie and uploaded it to my blog.

Two good options for uploading your completed movie to the web are Castpost and You Tube. I have no idea which is better but at the moment Castpost is full and not taking any new members, therefore You Tube is probably your best bet!

HERE IS THE PROCESS I FOLLOWED:

  • First we story-boarded our ideas on the whiteboard - these included an introduction, explanation of what we were doing and an example of us doing it.
  • Then we chose different students to say each part.
  • After that we practised and I videoed each part in sections.
  • Then with a student's help I uploaded my video to my imovie programme on my laptop via the USB cable.
  • After school I played around with the video, cutting & splicing it and adding some effects.
  • Then I had to get my GIANT full sized video small enough to put on the web. To do this I clicked on File>Share>Email on imovie. This compressed my movie to 10 frames per second and dramatically reduced the file size. I emailed the movie to myself so I could upload it.
  • Then I grabbed my movie from my email and uploaded it to You Tube!

    Gosh, sounds more complicated when you write it out like that doesn't it! I haven't much experience with full-on editing in imovie so that part of the process took me w wee while, it wasn't a perfect job but we all learn from our first attempts don't we!


    NOTE: If your internet connection is slow or dial up we suggest you let the video play once sluggishly (right until the end) while you have a cuppa. It will then be easier to view the second time it has loaded.
  • Friday, 8 September 2006

    Room One famous on ULearn

    Today was a complete surprise, Kaye emailed to say that my class blog and Mot South's blog was added to the ULearn website by the National Facilitator as an example of classroom blogging.

    When I told the kids they thought they were really famous as I'd said that there would be lots of other teachers looking at our blog!

    A great boost today, just what I'd needed after a pretty draining week!

    PS: Do you like the way he pulled out the post about us going to the beach!! (didn't I just tell you it was a draining week!)

    Sunday, 3 September 2006

    How to take a Screenshot

    Often you will want to capture a shot of something on your computer screen to use as an example or to show to someone etc.

    On a mac this is easy:
    * To capture the entire screen, press Apple/Command+Shift+3.
    * To capture part of a screen, press Apple/Command+Shift+4 (the cursor will then turn into a cross-hairs icon. Click and drag over an area to select it. When you release the mouse button, the image is taken, and you'll hear a snapshot sound)

    You will then find the screen shot is saved to your desktop as a photo. You can then crop/add photo effects etc and easily upload the photo to your blog. Don't forget however to change the file to be a jpg by going to File>Save As and choosing >jpg.

    See this article for more info on taking screenshots on your computer.

    To see an example of how I effectively use screenshots on my blog see this post.

    Friday, 1 September 2006

    Bubble Share - share photos on your blog

    Bubble Share is a neat photo hosting site that you can use for free to create photo albums to upload onto your blog. One of the best things about Bubble Share is that you can keep your photos & albums completely private, which is a neat feature for schools! With a lot of other websites you are forced to share your photos with the big wide world.

    You can create sliding photo albums (called Story albums)to appear on your blog like this one I made to go on my class blog.


    This album is powered by
    BubbleShare
    - Add to my blog


    Uploading is easy, you simply select the photos you want from your computer and upload them one by one, then you choose how you want your album to look and the site will generate a code for you to copy and paste into your blog.

    You can also record and add your voice but I haven't experimented with that yet :)